> ## Documentation Index
> Fetch the complete documentation index at: https://hyperwhisper.com/docs/llms.txt
> Use this file to discover all available pages before exploring further.
# Keyboard Shortcuts & Accessibility
> Customize global hotkeys, configure push-to-talk, set up Quick Capture, and understand what the menu bar icon shows.
HyperWhisper relies on global shortcuts so you can control recording without leaving your current app. This page covers the default bindings, how to customize them, push-to-talk options, Quick Capture, and what you can do from the menu bar or system tray.
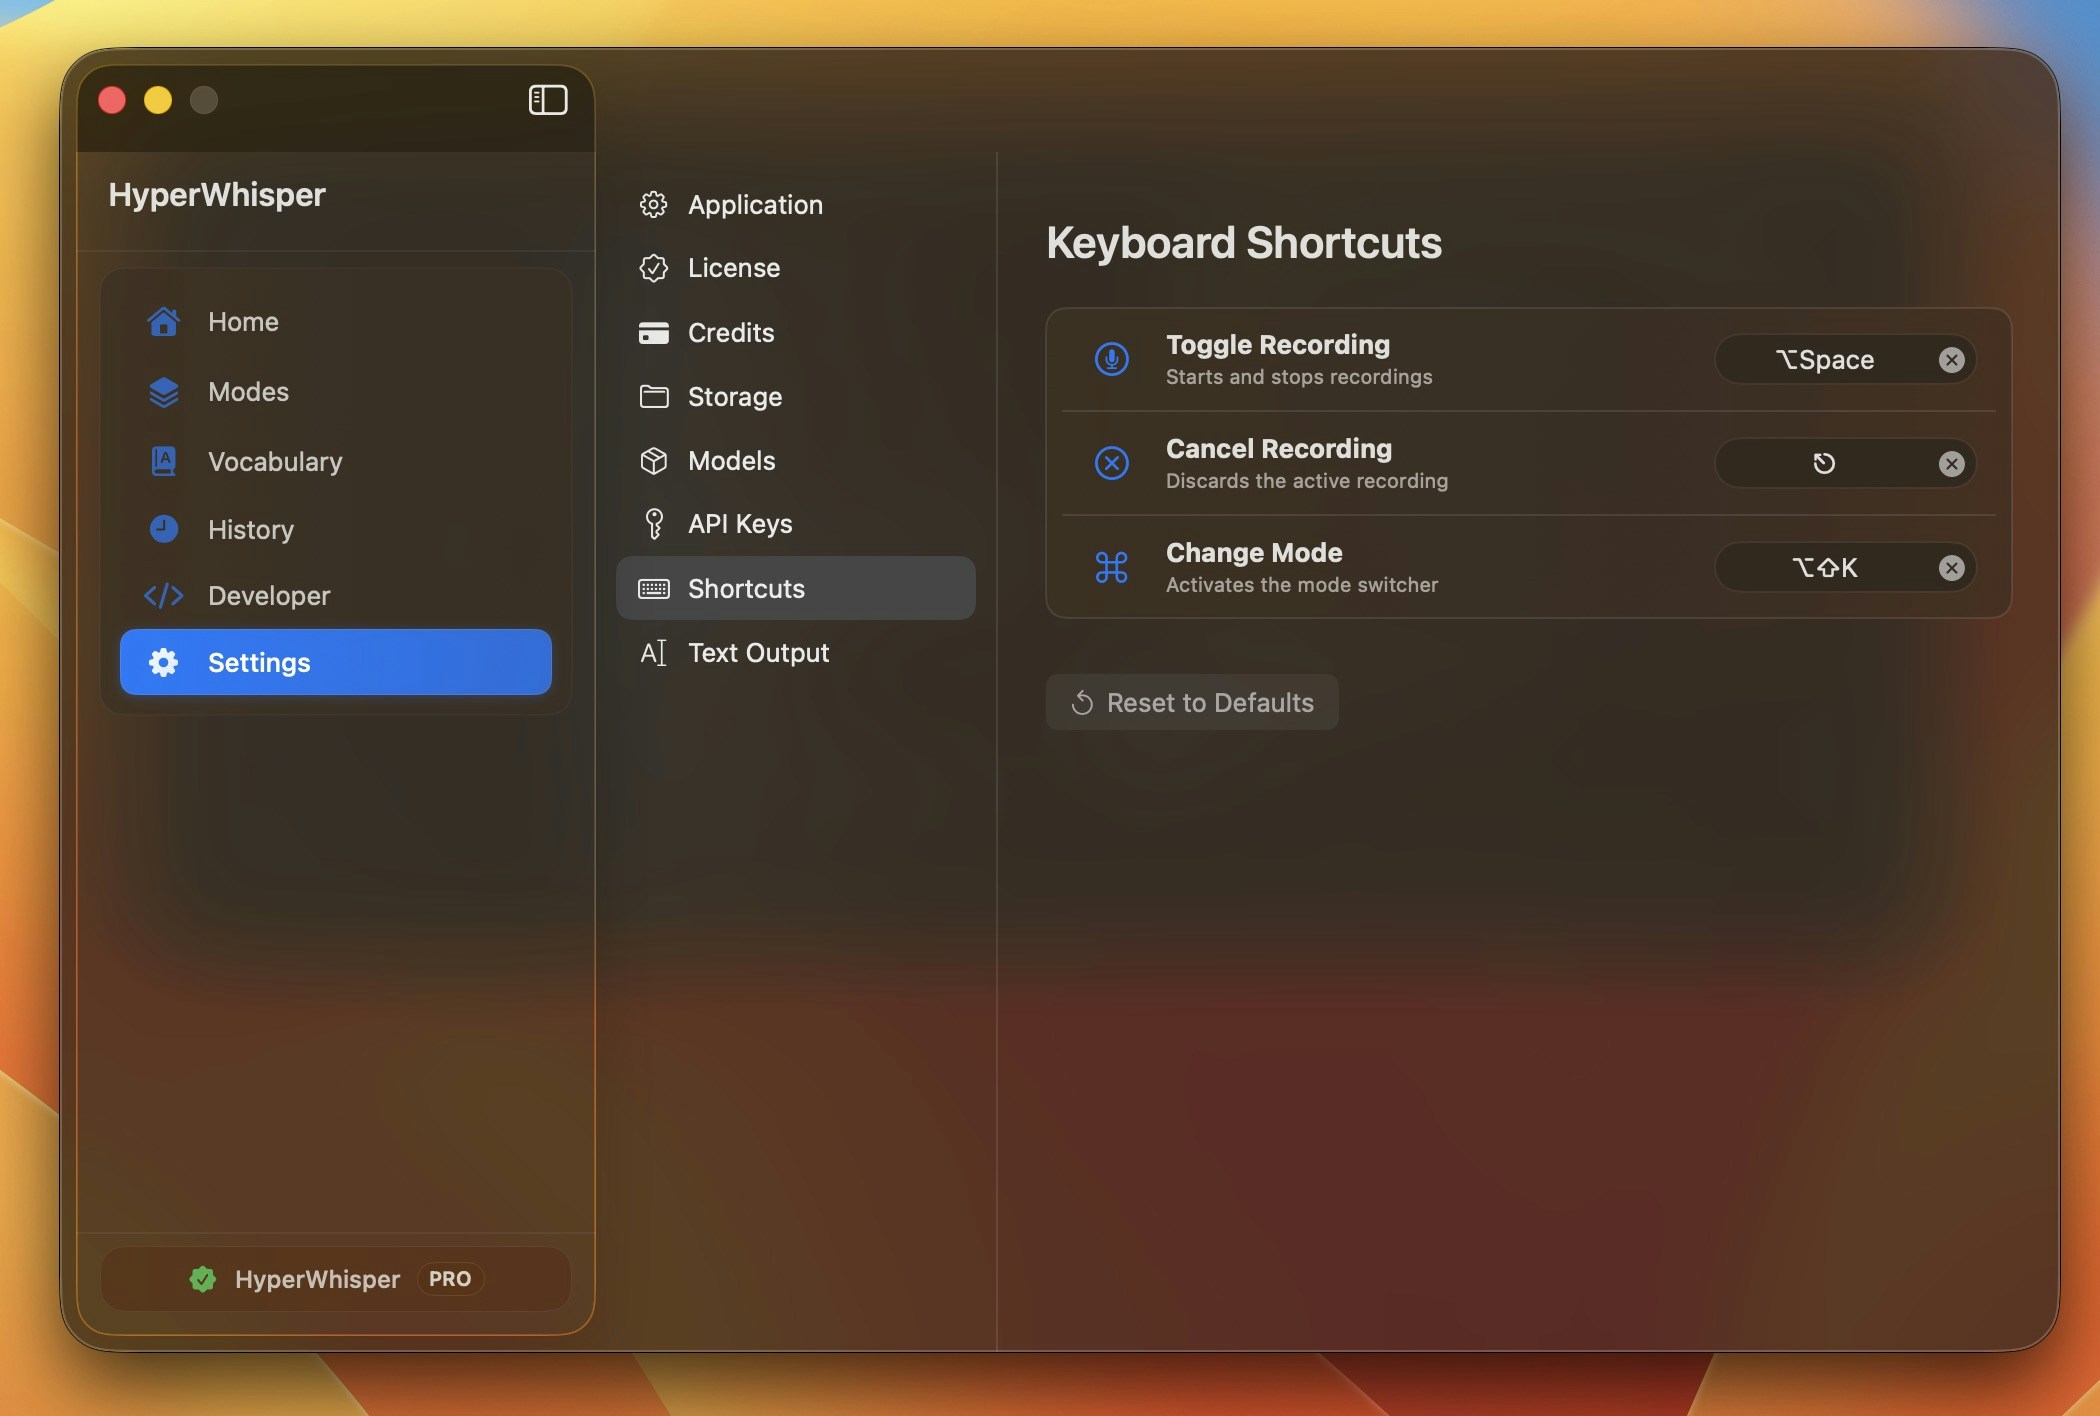 ## Default Global Shortcuts
| Action | Default | Description |
| ------------------- | --------- | -------------------------------------------------- |
| Toggle recording | `⌥Space` | Starts or stops a transcription session. |
| Cancel recording | `Esc` | Discards the active session without saving. |
| Change mode | `⌃⇧K` | Cycles through your available modes from anywhere. |
| Streaming recording | `⌥⇧Space` | Starts a streaming transcription session. |
HyperWhisper keeps these handlers registered even when you quit to the menu bar, so they stay active system-wide.
| Action | Default | Description |
| ------------------- | ------------------ | -------------------------------------------------- |
| Toggle recording | `Ctrl+Alt` | Starts or stops a transcription session. |
| Cancel recording | `Esc` | Discards the active session without saving. |
| Change mode | `Ctrl+Shift+.` | Cycles through your available modes from anywhere. |
| Streaming recording | `Ctrl+Shift+Space` | Starts a streaming transcription session. |
## Recording Activation Modes
You can trigger recording in three ways:
* **Toggle** — Press once to start, press again to stop. Hands-free after activation.
* **Push-to-talk (hold)** — Hold a key or modifier down to record; release to stop. Great for short bursts where you want zero risk of leaving recording on.
* **Double-press to lock** — Tap the push-to-talk key twice quickly to lock recording on; tap twice again to stop. Useful when you want hands-free recording without switching to the toggle shortcut.
## Customizing Shortcuts
Go to **Settings → Shortcuts**.
Click the recorder control next to the action you want to change, then press the new key combination.
Conflicting assignments are flagged immediately. Pick an unused combination if macOS rejects your choice.
Use the **Reset to Defaults** button at the bottom of the card to revert all shortcuts in one step.
Go to **Settings → Shortcuts**.
Click the shortcut field for the action you want to change, then press your desired key combination.
A warning banner appears if your new shortcut conflicts with another binding. Choose a different combination.
Click **Reset to Defaults** to revert all shortcuts at once.
## Push-to-Talk
Push-to-talk lets you record while holding a key — the moment you release, recording stops and transcription begins. It mirrors a walkie-talkie and is ideal for short bursts where you want precise control.
### Enabling and choosing a trigger key
Go to **Settings → Shortcuts** and turn on the **Push to Talk** toggle.
Once enabled, choose your trigger from the mode picker:
| Option | Key |
| ---------------- | ------------------------ |
| FN Key | Globe / Fn key |
| Control Key | Left `⌃` modifier |
| Left Option Key | Left `⌥` modifier |
| Right Option Key | Right `⌥` modifier |
| FN + Control | Fn + `⌃` held together |
| FN + Left Option | Fn + `⌥` held together |
| Custom Shortcut | Any key combo you record |
**Bare modifier modes** (FN, Control, Option) require **Accessibility permission** because macOS only exposes raw modifier key events via the Accessibility API. HyperWhisper will prompt you if the permission is missing. See [Permissions](/permissions) for the setup steps.
Push-to-talk has a **250 ms activation delay** before recording begins. This filters out modifier keys you press as part of normal shortcuts (for example, `⌘C` to copy) so they do not accidentally trigger a recording session.
Go to **Settings → Shortcuts** and set Push to Talk to **Modifier** or **Custom**.
**Modifier mode** — hold a single modifier key to record. Available modifiers:
* Left Alt
* Right Alt
* Shift
**Custom mode** — record any key combination as the hold trigger.
When the mode is set to **Disabled**, push-to-talk is off and the toggle shortcut is used instead.
### Double-press to lock
When double-press is enabled, tapping the push-to-talk key twice in quick succession locks recording on — you no longer need to hold the key. Tap twice again to stop.
The **Double Press to Lock** toggle appears in **Settings → Shortcuts** under the push-to-talk card. It is shown only when your push-to-talk mode is set to a single modifier key (FN, Control, Left Option, or Right Option). Combo modes (FN + Control, FN + Left Option) and Custom mode do not support double-press lock.
The detection window is **1.5 seconds** — both taps must land within that interval to engage lock mode.
The **Double-Press Lock** checkbox is available in **Settings → Shortcuts** when push-to-talk is set to Modifier mode.
## Quick Capture (macOS)
Quick Capture is a macOS-only feature that sends a transcription directly to a new Apple Notes note rather than pasting into your focused app. It is useful for capturing ideas without switching context.
### Setting it up
Go to **Settings → Shortcuts** and turn on the **Quick Capture** toggle.
A shortcut recorder appears below the toggle. Click it and press the key combination you want to use.
A mode picker lets you select which transcription mode Quick Capture uses. You can pin it to a specific mode or set it to **Current Mode** so it always follows your active selection.
The first time Quick Capture runs, macOS asks whether HyperWhisper can control Apple Notes. Click **OK**. If you accidentally denied it, go to **System Settings → Privacy & Security → Automation** and enable HyperWhisper's access to Notes.
If the automation permission has been denied, a warning banner appears in the Quick Capture settings card with instructions for re-enabling it in System Settings.
## Menu Bar Icon & Status (macOS)
HyperWhisper lives in the macOS menu bar. For the full menu item reference including mode switching, microphone switching, and tray behavior on Windows, see [Menu Bar & Tray Controls](/menu-bar).
The icon changes to indicate the current state:
| State | Icon appearance |
| ------------------------------- | ------------------------------------------------------ |
| Idle | Standard template icon (adapts to light/dark menu bar) |
| Recording | Red tinted icon |
| Transcribing or post-processing | Standard icon (processing happens in the background) |
The icon also carries an **accessibility label** that screen readers announce as "Recording", "Processing", or "Idle" depending on the current state.
### What the menu contains
Click the menu bar icon to open the HyperWhisper menu. It contains:
* **Start / Stop Recording** — toggles the active recording session. Displays your configured shortcut hint on the right (or "Hold FN", "Hold ⌃", etc. if push-to-talk is enabled without a toggle shortcut).
* **History** — opens the main window to the recording history.
* **Settings** — opens the main window to Settings.
* **Microphone** — submenu listing all available input devices. A checkmark marks the currently active device; the system default input shows a "(Default)" label.
* **Select Mode** — submenu listing all your modes. A checkmark marks the active mode.
* **Transcribe File** — submenu listing your modes. Selecting one opens a file picker so you can transcribe an audio or video file using that mode.
* **Help Center / Contact Support / Feedback** — links to the docs and support portal.
* **Version** — displays the current app version (dimmed, not interactive).
* **Quit** — exits HyperWhisper.
## System Tray Icon & Status (Windows)
On Windows, HyperWhisper shows an icon in the system tray. Double-clicking the icon opens the main window.
Right-clicking the tray icon opens a context menu with the same set of actions as the macOS menu bar:
* **Start / Stop Recording**
* **History**
* **Settings**
* **Microphone** submenu
* **Select Mode** submenu
* **Transcribe File** submenu
* **Check for Updates**
* **Version** label
* **Quit**
When you close the main window, HyperWhisper minimizes to the system tray and stays active. A balloon notification confirms it is still running and shows your current toggle shortcut.
## Troubleshooting Shortcuts
* **Shortcut not responding** — some key combinations (especially bare function keys) are consumed by other apps or macOS. Add at least one modifier (`⌥`, `⌃`, or `⇧`) to reduce conflicts.
* **Push-to-talk not triggering** — on macOS, bare modifier modes (Control, Option) require Accessibility permission. Open **System Settings → Privacy & Security → Accessibility** and ensure HyperWhisper is listed and enabled.
* **Shortcut stops working after a while** — on macOS, opening the main window once can re-activate background listeners that were paused by the system.
* **Windows shortcut conflict** — a warning banner appears in Settings → Shortcuts when two actions share the same combination. Resolve the conflict before saving.
## Default Global Shortcuts
| Action | Default | Description |
| ------------------- | --------- | -------------------------------------------------- |
| Toggle recording | `⌥Space` | Starts or stops a transcription session. |
| Cancel recording | `Esc` | Discards the active session without saving. |
| Change mode | `⌃⇧K` | Cycles through your available modes from anywhere. |
| Streaming recording | `⌥⇧Space` | Starts a streaming transcription session. |
HyperWhisper keeps these handlers registered even when you quit to the menu bar, so they stay active system-wide.
| Action | Default | Description |
| ------------------- | ------------------ | -------------------------------------------------- |
| Toggle recording | `Ctrl+Alt` | Starts or stops a transcription session. |
| Cancel recording | `Esc` | Discards the active session without saving. |
| Change mode | `Ctrl+Shift+.` | Cycles through your available modes from anywhere. |
| Streaming recording | `Ctrl+Shift+Space` | Starts a streaming transcription session. |
## Recording Activation Modes
You can trigger recording in three ways:
* **Toggle** — Press once to start, press again to stop. Hands-free after activation.
* **Push-to-talk (hold)** — Hold a key or modifier down to record; release to stop. Great for short bursts where you want zero risk of leaving recording on.
* **Double-press to lock** — Tap the push-to-talk key twice quickly to lock recording on; tap twice again to stop. Useful when you want hands-free recording without switching to the toggle shortcut.
## Customizing Shortcuts
Go to **Settings → Shortcuts**.
Click the recorder control next to the action you want to change, then press the new key combination.
Conflicting assignments are flagged immediately. Pick an unused combination if macOS rejects your choice.
Use the **Reset to Defaults** button at the bottom of the card to revert all shortcuts in one step.
Go to **Settings → Shortcuts**.
Click the shortcut field for the action you want to change, then press your desired key combination.
A warning banner appears if your new shortcut conflicts with another binding. Choose a different combination.
Click **Reset to Defaults** to revert all shortcuts at once.
## Push-to-Talk
Push-to-talk lets you record while holding a key — the moment you release, recording stops and transcription begins. It mirrors a walkie-talkie and is ideal for short bursts where you want precise control.
### Enabling and choosing a trigger key
Go to **Settings → Shortcuts** and turn on the **Push to Talk** toggle.
Once enabled, choose your trigger from the mode picker:
| Option | Key |
| ---------------- | ------------------------ |
| FN Key | Globe / Fn key |
| Control Key | Left `⌃` modifier |
| Left Option Key | Left `⌥` modifier |
| Right Option Key | Right `⌥` modifier |
| FN + Control | Fn + `⌃` held together |
| FN + Left Option | Fn + `⌥` held together |
| Custom Shortcut | Any key combo you record |
**Bare modifier modes** (FN, Control, Option) require **Accessibility permission** because macOS only exposes raw modifier key events via the Accessibility API. HyperWhisper will prompt you if the permission is missing. See [Permissions](/permissions) for the setup steps.
Push-to-talk has a **250 ms activation delay** before recording begins. This filters out modifier keys you press as part of normal shortcuts (for example, `⌘C` to copy) so they do not accidentally trigger a recording session.
Go to **Settings → Shortcuts** and set Push to Talk to **Modifier** or **Custom**.
**Modifier mode** — hold a single modifier key to record. Available modifiers:
* Left Alt
* Right Alt
* Shift
**Custom mode** — record any key combination as the hold trigger.
When the mode is set to **Disabled**, push-to-talk is off and the toggle shortcut is used instead.
### Double-press to lock
When double-press is enabled, tapping the push-to-talk key twice in quick succession locks recording on — you no longer need to hold the key. Tap twice again to stop.
The **Double Press to Lock** toggle appears in **Settings → Shortcuts** under the push-to-talk card. It is shown only when your push-to-talk mode is set to a single modifier key (FN, Control, Left Option, or Right Option). Combo modes (FN + Control, FN + Left Option) and Custom mode do not support double-press lock.
The detection window is **1.5 seconds** — both taps must land within that interval to engage lock mode.
The **Double-Press Lock** checkbox is available in **Settings → Shortcuts** when push-to-talk is set to Modifier mode.
## Quick Capture (macOS)
Quick Capture is a macOS-only feature that sends a transcription directly to a new Apple Notes note rather than pasting into your focused app. It is useful for capturing ideas without switching context.
### Setting it up
Go to **Settings → Shortcuts** and turn on the **Quick Capture** toggle.
A shortcut recorder appears below the toggle. Click it and press the key combination you want to use.
A mode picker lets you select which transcription mode Quick Capture uses. You can pin it to a specific mode or set it to **Current Mode** so it always follows your active selection.
The first time Quick Capture runs, macOS asks whether HyperWhisper can control Apple Notes. Click **OK**. If you accidentally denied it, go to **System Settings → Privacy & Security → Automation** and enable HyperWhisper's access to Notes.
If the automation permission has been denied, a warning banner appears in the Quick Capture settings card with instructions for re-enabling it in System Settings.
## Menu Bar Icon & Status (macOS)
HyperWhisper lives in the macOS menu bar. For the full menu item reference including mode switching, microphone switching, and tray behavior on Windows, see [Menu Bar & Tray Controls](/menu-bar).
The icon changes to indicate the current state:
| State | Icon appearance |
| ------------------------------- | ------------------------------------------------------ |
| Idle | Standard template icon (adapts to light/dark menu bar) |
| Recording | Red tinted icon |
| Transcribing or post-processing | Standard icon (processing happens in the background) |
The icon also carries an **accessibility label** that screen readers announce as "Recording", "Processing", or "Idle" depending on the current state.
### What the menu contains
Click the menu bar icon to open the HyperWhisper menu. It contains:
* **Start / Stop Recording** — toggles the active recording session. Displays your configured shortcut hint on the right (or "Hold FN", "Hold ⌃", etc. if push-to-talk is enabled without a toggle shortcut).
* **History** — opens the main window to the recording history.
* **Settings** — opens the main window to Settings.
* **Microphone** — submenu listing all available input devices. A checkmark marks the currently active device; the system default input shows a "(Default)" label.
* **Select Mode** — submenu listing all your modes. A checkmark marks the active mode.
* **Transcribe File** — submenu listing your modes. Selecting one opens a file picker so you can transcribe an audio or video file using that mode.
* **Help Center / Contact Support / Feedback** — links to the docs and support portal.
* **Version** — displays the current app version (dimmed, not interactive).
* **Quit** — exits HyperWhisper.
## System Tray Icon & Status (Windows)
On Windows, HyperWhisper shows an icon in the system tray. Double-clicking the icon opens the main window.
Right-clicking the tray icon opens a context menu with the same set of actions as the macOS menu bar:
* **Start / Stop Recording**
* **History**
* **Settings**
* **Microphone** submenu
* **Select Mode** submenu
* **Transcribe File** submenu
* **Check for Updates**
* **Version** label
* **Quit**
When you close the main window, HyperWhisper minimizes to the system tray and stays active. A balloon notification confirms it is still running and shows your current toggle shortcut.
## Troubleshooting Shortcuts
* **Shortcut not responding** — some key combinations (especially bare function keys) are consumed by other apps or macOS. Add at least one modifier (`⌥`, `⌃`, or `⇧`) to reduce conflicts.
* **Push-to-talk not triggering** — on macOS, bare modifier modes (Control, Option) require Accessibility permission. Open **System Settings → Privacy & Security → Accessibility** and ensure HyperWhisper is listed and enabled.
* **Shortcut stops working after a while** — on macOS, opening the main window once can re-activate background listeners that were paused by the system.
* **Windows shortcut conflict** — a warning banner appears in Settings → Shortcuts when two actions share the same combination. Resolve the conflict before saving.